Miner's Folly
<infobox> <title source="title"><default>Miner's Folly</default></title> <image source="image">
<default>No picture.png</default>
</image>
<group>
<header>Location</header>
<image source="map"></image>
<label>Region</label>
<format>{{#switch:Ash Canyon
|Mystery Lake=Mystery Lake
|Coastal Highway=Coastal Highway
|Pleasant Valley=Pleasant Valley
|Desolation Point=Desolation Point
|Timberwolf Mountain=Timberwolf Mountain
|Forlorn Muskeg=Forlorn Muskeg
|Broken Railroad=Broken Railroad
|Mountain Town=Mountain Town
|Hushed River Valley=Hushed River Valley
|Bleak Inlet=Bleak Inlet
|Ash Canyon=Ash Canyon
|Transfer Pass=Transfer Pass
|Forsaken Airfield=Forsaken Airfield
|Zone of Contamination=Zone of Contamination
|Sundered Pass=Sundered Pass
|transition zone=Transition Zone
|Crumbling Highway=Old Island Connector
|The Ravine=The Ravine
|Keeper's Pass South=Keeper's Pass South
|Keeper's Pass North=Keeper's Pass North
|Far Range Branch Line=Far Range Branch Line
}}</format>
<label>Location</label>
<label>Sublocations</label>
<label>Description</label>
<header>General</header>
<label>Type</label><format>{{#switch:industrial
|residential=Residential
|industrial=Industrial
|store=Store
|sporting=Military/Sporting
|cave=Cave
|outdoors=Outdoors
|landmark=Landmark
}}
{{#switch:{{{type 2}}}
|store=Store
|sporting=Military/Sporting
}}</format>
<label>Firebox</label><format>{{#switch:
|fire barrel= Fire Barrel
|pot belly stove= Pot Belly Stove
|wood stove= Wood Stove
|fireplace= Fireplace
|stove= Stove
|furnace= Furnace
|rim grill= Rim Grill
}}
{{#switch:{{{firebox2}}}
|fire barrel= Fire Barrel
|pot belly stove= Pot Belly Stove
|wood stove= Wood Stove
|fire place= Fireplace
|stove= Stove
|furnance= Furnance
|rim grill= Rim Grill
}}</format>
<group>
<label>![]() </label><format>{{#ifeq:yes|yes|Has a bed}}</format>
<label>
</label><format>{{#ifeq:yes|yes|Has a bed}}</format>
<label>![]() </label><format>{{#ifeq:|yes|Has a forge}}</format>
<label>
</label><format>{{#ifeq:|yes|Has a forge}}</format>
<label>![]() </label><format>{{#ifeq:yes|yes|Has a workbench}}</format>
<label>{{#if:yes|{{#switch:yes
|yes=
</label><format>{{#ifeq:yes|yes|Has a workbench}}</format>
<label>{{#if:yes|{{#switch:yes
|yes=![]() |partial=
|partial=![]() |no=
|no=![]() }}|
}}|![]() }}
</label>
<format>{{#switch:yes
|yes=Has an interior
|partial=Provides some shelter
|no=Has no shelter
}}</format><default>Has no shelter</default>
</group>
</group>
<group>
<header>Wintermute</header>
<label>Missions</label>
<label>Characters</label>
</group>
</infobox>
Miner's Folly is a collection of ruined buildings, except for one, located in the northern part of Ash Canyon, to the east.
}}
</label>
<format>{{#switch:yes
|yes=Has an interior
|partial=Provides some shelter
|no=Has no shelter
}}</format><default>Has no shelter</default>
</group>
</group>
<group>
<header>Wintermute</header>
<label>Missions</label>
<label>Characters</label>
</group>
</infobox>
Miner's Folly is a collection of ruined buildings, except for one, located in the northern part of Ash Canyon, to the east.
Access to the Area
Initially, there are only three access points to this area:
- Climbing to the plateau just below the Mining Camp (three rope climbs required), and then crossing the north part of the map from west to east through many bridges, finally having to go through a choke point with a bear. Probably the longest and most dangerous path.
- The safer path, climbing to High Meadow from the plateau with the Climber's Cave (two rope climbs), cross a couple of bridges and that's it, no choke point, no bear.
- The faster path, walking to the north until you reach the cave next to Long Falls, go through the cave (one rope climb inside), then go through the choke point with the bear.
Once the area is visited another access can be opened, if the player deploys a rope from Homesteader's Respite, but to get there, another pretty long rope climb (with one ledge) is in the way. Once the rope is deployed, the resulting path would have two rope climbs (one very long) but with an indoors shelter (Homesteader's Respite) in between the two, and no chokepoint with bear, making it quite safe.
It is possible to reach Homesteader's Respite from Bitter Marsh without a rope by walking up a nearby slope and sticking to the cliff-face, then dropping onto the ledge below. This path is the fastest for reaching Miner's Folly, however it clearly isn't a path Hinterland intended for players to take, and the steep angle may cause multiple sprains, which will require treatment before climbing the long rope to Fire Overlook.
Overview
A Work Bench as well as a Fire Barrel are available in the main ruined barn, which is partly open to the elements and predators. Reclaimed wood and a few other miscellaneous supplies may be found scattered around the site or in containers.
There is also a small house that provides shelter and can be used as a Safe House It has a bed and some containers, along with books, food, clothing, and curtains—one of the few sources of cloth in Ash Canyon. It might sometimes contain a hatchet or a hacksaw.
There may be deer around to hunt, but, when hunting or crafting at the work bench, it's a good idea to be aware of the bear that lives in the nearby cave tunnel and wanders the area. The plateau may also be home to a moose and up to 3 wolves, making the area significantly more dangerous.
Although technically a separate location, the Foreman's Retreat is located close by, as well.
Renewable Resources
- Up to 5 Ptarmigan will land near Foreman's Retreat.
- Up to 17 Sticks will spawn after a blizzard. No branches or limbs will spawn.
- A guaranteed Bear spawn in the nearby cave.
- A chance of a Deer Spawn in the area.
- Up to 5 Reclaimed Wood will spawn around the open shack where the Workbench is.
Nearby unnamed locations
- There is a walkthrough cave with a bed and possibly some minor loot in the rocks near to the Foreman's Retreat.
- This cave may contain a polaroid (unconfirmed) - *confirmed on Interloper (inside a container)
- A Rope bridge leads from Miner's Folly south-east (down and right on in-game map) towards a cave with a container and eventually to High Meadow.
- When crossing, pay attention to the ground and wooden supports on both edges of the bridge as up to 80 Cardboard Matches spawn there, 20 on the northern side on the wood platform, 40 on the southern side just lazing on the ground and 20 on the southern side on nearby rocks (on the right side). This spot may be very important to check on Interloper, as sources of fire are scarce.
Gallery
-
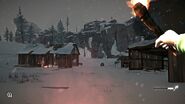 Bear at Miner's Folly
 -
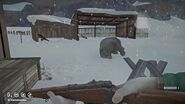 Taking down the bear makes the whole area safer while providing a good source of food
 -
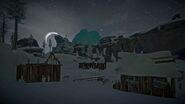 Miner's Folly at night. The house on the right, the barn at the back.
 -
 Typical day in Ash Canyon
 -
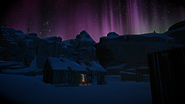 Miner's Folly during the Aurora.
 -
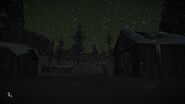
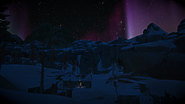 Another view of Miner's Folly during the aurora.


{{#invoke:Navbox|navbox}} ru:Убежище бригадира